
Nowadays, computers are extremely efficient and scientific. We have quantum computers, supercomputers, desktop computers, laptop computers, computers that sit on our face, computers that fit in our ears, and computers that fold in half. New digital audio standards are continually improving fidelity, and new digital video standards are constantly outperforming previous dimensions of pixel density. Computers and their peripherals glow with captivating light effects and connect wirelessly with one another using. However, one thing has not improved at all since the 1870s: the computer keyboard. Despite hundreds of better options, the outdated offset QWERTY keyboard somehow remains standard to this day.
Here's why I switched keyboards, and how I did it.
A Quick Keyboard Primer
Before we get started, here's a quick primer on the three key properties of a keyboard (check out this article for more detailed information and more pictures as examples):
Form Factor
The physical shape and size of a keyboard determine the keyboard's Form Factor. Some are quite large, and others are quite small. All are designed with different use-case scenarios and purposes in mind. Programmers, Gamers, and Video Editors may have keyboards with lots of extra keys for specialized tasks, while Writers may have a small keyboard with room for only the alphabet. Common form factors are Full (100%), Ten-Key-Less, 75%, 65%, and 60%.
Layout
The shape and size of the keys (within a particular keyboard Form Factor) determine the keyboard's Layout. Layouts tend to determine which keys are present, and where they are placed. Common layouts are Staggered and Columnar, as well as Split.
Language
The punctuation, letters, and numerals that are recognized when you tap a particular key determine the keyboard's Language. Usually, this Language is printed on top of the keycaps themselves, but it is possible to change the Language in your computer's settings so that it interprets a keyboard's default Language differently. Common keyboard languages vary based on geographic area, but it is important to note that keyboard languages are not the same as spoken or written languages. For example, a person wishing to type in English may use a QWERTY, COLEMAN, or DVORAK keyboard language. All three of these keyboard languages use English letters, but arrange them in different ways.
Note that I have not mentioned other properties of keyboards, such as the connection method (wireless/wired) and the lighting package (LED underglow or no). That is because I will be focusing on the three primary keyboard properties in this blog post. Now that we have familiarized ourselves with these terms, we are ready to move on.
A Quick History of QWERTY
Back when people first began to use typewriters, every typewriter manufacturing company had a different keyboard layout. Because no one could initially agree on what letters, numbers, and symbols should reside on every typewriter, secretaries had to learn a different configuration every time they switched companies or machines. As you might imagine, this resulted in a lot of pressure for a common keyboard layout standard to be adopted. For a while, the most popular keyboard organizational scheme placed all of the letter keys in alphabetical order (from left to right, top to bottom), which made logical sense. However, this interfered with the efficient operation of mechanical typewriters.
You see, while typewriter manufacturers couldn't agree on the keyboard layout, they all tended to agree on the keyboard form factor, because of physical constraints. Mechanical typewriters used a physical metal bar to connect every key on the keyboard to the rear of the typing machine, where the bar would activate a metal die that would stamp a symbol onto paper. In order to prevent these metal connecting rods from striking each other (and simultaneously prevent the keyboard from spreading out beyond the width of a normal human hand), it was necessary to stagger each rows of keys. This resulted in the "offset" keyboard layout seen today on nearly all mainstream computer keyboards. Of course, this clever mechanical solution was still a tight fit.
Even with the typewriter's rows of keys offset from one another, the connecting rods were still remarkably close. If keys close to one another were pressed down at nearly the same time, it was possible for those keys to become "stuck," meaning that they had to be pried back up, interrupting the typist's rhythm. Therefore, it was desirable to separate keys that might commonly be pressed shortly after one another. But placing all of the letter keys in alphabetical order resulted in some of the most heavily-used keys sitting next to each other (and thus more likely to be pressed down at nearly the same time and get stuck). For this reason, a new keyboard language was designed and popularized that worked best with the mechanical typewriter keyboard form factor. Taking advantage of the fact that not all letters in the English language are used at the same frequency, the QWERTY keyboard language was born. QWERTY (which is still in widespread use today) was adopted simply because it was the keyboard language that spread the most-frequently-used keys farthest apart and thus prevented sticky keys on mechanical typewriters.
Here's a useful video that elaborates:
And Now for Something Completely Different
Almost as soon as the QWERTY keyboard language became widespread across all makes and models of mechanical typewriters, a number of alternative keyboard languages were proposed. No one took these seriously, however, until electronic keyboards arrived with the advent of the electronic keyboard and then the digital computer. Once keyboards were no longer purely mechanical, there was no longer any danger of keys getting stuck when pressed nearly simultaneously. In fact, electronics made possible completely new combinations of keys! Each key no longer featured a physical linkage to a printing surface. Instead, each keycap only covered a small switch connected to a circuit board, leaving plenty of room for experimentation and reorganization. The Dvorak keyboard language (along with others, such as the Coleman) was proposed as a more ergonomic, efficient, and logical alternative to the QWERTY keyboard language. The three following advantages of the Dvorak keyboard language makes it easier and faster to use (at least, for beginning typists who don't have to un-learn old habits):
More Ergonomic: Instead of putting letters in alphabetical order or spreading common letters far apart, the most-used letters are placed in the center row of the keyboard. This reduces the distance a typist's hands must move, thus reducing finger stress.
More Efficient: Vowels are placed on the left, while the most-used consonants are placed on the right. Since most English words alternate between vowels and consonants, this allows typists to increase their speed.
More Logical: Many common English letter combinations have been build-in to the keyboard layout. For example, "th" and "sh" are common, and this format places those letters so that they can be easily typed in a strumming motion with the right hand (see image below).

Notice that the Dvorak keyboard language does not attempt to change the traditional "staggered" keyboard layout used by the common QWERTY keyboard language; it is simply a new keyboard language superimposed over the existing offset keyboard layout on the existing physical keyboard form factor. In the image above, you can clearly see that both the offset keyboard layout and the keyboard form factor are holdouts from the days of mechanical typewriters. This, of course, is because most mainstream computer keyboards still use the old layout and form factor. Since Dvorak is a keyboard language, it can be used on any keyboard layout. However, if the Dvorak keyboard language can be used on a traditional keyboard layout, most people may not feel any strong desire to bother switching away from the QWERTY keyboard language they know so well. I, on the other hand, saw an opportunity. If the Dvorak keyboard language can be used on a traditional keyboard layout, then it would be easier to learn than a completely unfamiliar language on a completely unfamiliar layout! Considering the three benefits listed above, I added a fourth benefit: the excitement of challenging myself to try something new and different. So I dove in.
The Switcheroo
Upon deciding that I was serious about learning the Dvorak keyboard language, I set myself some ground rules:
I wanted to learn to touch-type, not just hunt-and-peck. In the long term, this would allow me to be a much faster and more accurate typist. In the short term, however, this task would be much harder than I expected. The problem was that all of the keyboards I was using still had the old QWERTY keyboard language printed on the keys. This meant that every time I needed to type a letter, I would be tempted to look down at my fingers. Of course, looking at the keyboard would be of no help whatsoever, since the letters printed on the keys did not match the keyboard language I was attempting to learn. Instead, I ended up printing out the above diagram of the Dvorak keyboard language and placed the piece of paper on top of my hands. With both my hands and my keyboard hidden from view, I was forced to learn to touch-type the Dvorak keyboard language.
I wanted to learn as quickly as possible. This meant that I would need to completely avoid the old habits of typing using the QWERTY language for about a month. I strategically started this transition right before a major college writing assignment was due, so that I would have a lot of practice. Forcing myself to endure complete immersion meant my learning curve was steep, but it would ensure that my progress was steady.
With these two rules in place, I mastered the Dvorak keyboard language faster than I had thought possible. I was proficient in touch-typing the Dvorak keyboard language within about three weeks. Naturally, it helped that I was already familiar with touch-typing in general. But I was actually at a bit of a disadvantage, since my fingers were trained to use the old QWERTY keyboard language. It was conceivable that a new typist learning to touch-type for the first time using the Dvorak keyboard language might pick it up even faster. However, I was not done yet--not by a long shot.
Improving Ergonomics
Even before I had mastered the Dvorak keyboard language, I could already feel the benefits. I could tell that my fingers were traveling less distance across the keyboard during every typing session. Keeping the most common letters on the center row really did make the typing experience more fast and friendly. However, the Dvorak keyboard language had only improved the ergonomics of my fingers, not my wrists or shoulders. That was because my keyboard still had the offset layout and large form factor of the keyboard shown below:

All of this soon changed, however, as I was now hooked on two things:
The Pursuit of Ergonomics
New Experiences
Discovering what a difference such a (relatively) small change to my typing habits had made in my life, I was eager to discover what other ways I might improve my typing experience. This only fed my desire to continue learning new things, as the experience of learning a completely new keyboard language had trained my mind to be open to new experiences. That's how I stumbled across the split keyboard.
In order to further improve ergonomics, I decided to take my keyboard conversion a step further and switch away from a traditional keyboard. I moved to a Dygma split keyboard, shown below:

As you can see, splitting the keyboard into two halves allows the mouse to rest in between. This setup is ergonomic for both the shoulders and the wrists, as it spreads the hands to shoulder-width apart. Just as I transitioned from the QWERTY to the Dvorak keyboard languges by keeping my existing offset layout and form factor the same, I was now transitioning from the continuous form factor to the split form factor while keeping the Dvorak keyboard language and offset layout the same. However, it was too late to stop.
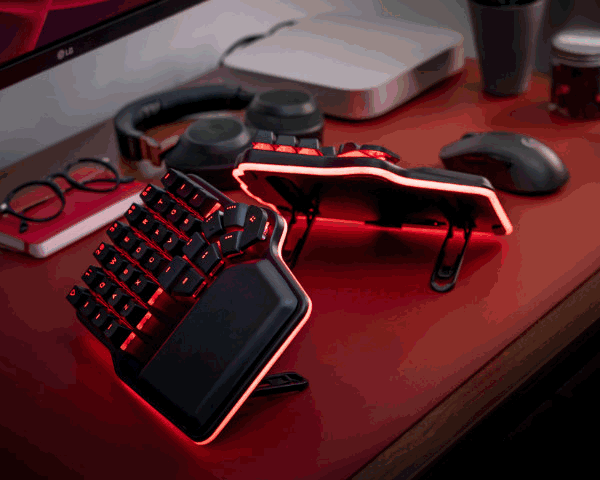
I went a step further with a tenting kit, as shown below:

By attaching adjustable feet to the bottoms of my split keyboard, I could tilt the two halves upward in the middle, reducing the twisting that often occurs in the wrist when typing. This significantly reduced wrist pain by helping to alleviate the onset of Carpal Tunnel syndrome. As you can see in the image below, my split, tented keyboard still straddles my computer mouse. However, there was still one final step to complete.

Through all of these transitions toward a more ergonomic, efficient typing environment, one property of the traditional keyboard had remained the same: the offset layout. The staggered, uneven rows and slanting columns were still there: a reminder of the old limitations of mechanical typewriters. So, as you can see in the image below, I made one final switch to a new layout (and form factor) with the new Dygma Defy keyboard, which you can see in different orientation below:
An astute observer will notice that although this final keyboard is still split and still tented , it is nevertheless quite different from my previous Dygma Raise. The main keys of the Defy are arranged in nice, neat columns, while the thumb keys are arranged in an arc along the bottom. While not as extremely geometrical as an ortholinear layout, this layout is better designed to conform to the human hand. The keys are arranged in columns because our fingers extend and retract far better than they move side to side. The columns are shifted slightly up or down because our fingers are slightly different lengths. The thumb clusters are full of buttons because our strongest fingers should do the most work and are the most flexible and precise. Finally, the thumb clusters are curved because our thumbs move side to side far better than they extend and retract.

In short, I have made changes to all three of the primary keyboard characteristics:
Form Factor
I have switched from a large, flat, straight keyboard to a smaller, split, tented, and rotated keyboard. This allows my shoulders to rest at a natural width apart, my hand to type at a natural angle, and my computer mouse to sit in a more accessible location. Overall, my computer workstation is now ergonomic and contributes to my overall health, rather than detracting from it.
Layout
I have switched from a traditional off-set layout with lots of modifier keys to be pressed by my pinkie fingers and a giant spacebar for my thumbs to a more natural arrangement of keys. Everything has been rearranged and shifted in size, shape, and location. The space bar has split into 16 different thumb keys, curved around my thumbs, while the rest of the keys have aligned themselves into straight, even columns that mirror the different heights of my finders. This allows my fingers to move in more natural ways.
Language
I have switched from QWERTY to DVORAK, in addition to changing the position of modifier keys such as shift, backspace, and delete. This is possible because the Defy keyboard is fully programmable (just like the Raise). The location of punctuation, letters, and numerals is no longer tied to what is printed on the keycaps, because software can assign any function to any key. In order to maximize the advantages of this powerful feature, I swapped all of my keycaps with "blank" keycaps, as you can see in the following image:

With no letters, numbers, or symbols printed on the keycaps, I have been forced to improve my touch-typing game and encouraged to experiment with new arrangements of keys. Now, instead of being stuck with whatever language was factory-printed on the keycaps, I have placed the most commonly-used symbols along the center row of the keyboard, and have placed the most commonly-used functions in the thumb clusters. This provides two major benefits. First of all, the customized keys allows my fingers to move faster, more efficiently, and more ergonomically. Secondly, the blank keycaps help me memorize the new layout faster and thus learn to touch-type in far less time, because I don't have printed letters, numbers and symbols tripping me up or letting me "cheat."
Through all of this keyboard form factor and layout transition, I have mostly left my Dvorak keyboard language intact. But in the spirit of ergonomic experimentation, I have made significant adjustments to the keybindings (the letter, number, symbol, or command linked to a particular keypress) on my Defy. As you can see below, my Defy keyboard has two different layers:

The first layer of my Defy features all of the letter and number keys, along with basic punctuation like period, comma, and apostrophe. I have also moved common commands like the Spacebar, Backspace, Delete, Control, and Enter to the thumb cluster.

On the second layer of my Defy (which is accessed by pressing and holding a key in the thumb cluster), I have placed less common punctuation, as well as keys that I use for navigating around spreadsheets. As you can see, there are still quite a few keys to which I have not assigned any function--and with dozens of layers possible, the possibilities are only limited to my ability to remember what every key does, and where it is located!
Typing With Your Thumbs
As you may have noticed in the pictures of my keyboard above, there are sixteen thumb keys instead of one giant spacebar. Multiple thumb keys is a key feature of many ergonomic keyboards, since it allows the typist to use their thumbs to press repetitive keys such as Enter, Shift, Space, Backspace, and Delete without having to stretch their hand so their pinky finger can reach those distant keys. Although it might seem strange to consider using your thumbs for pressing so many keys, we actually do it all the time without thinking about it on our smartphones. Whether we realize it or not, we type ALL of the keys on our virtual touchscreen keyboard with our thumbs. And that made me wonder if perhaps the Dvorak layout might me useful on my smartphone, as well.
Since a smartphone's keyboard is entirely virtual, it is relatively straightforward to change the layout. However, there is still a learning curve to getting used to the new arrangement of the letters (although not as steep of a curve as a touch-typing keyboard, because only your thumbs have to develop new muscle memory, and we tend to hunt-and-peck on our smartphones anyway). Strangely, the hardest part about using my smartphone's keyboard is not the particular layout of the buttons. Instead, the most difficult thing to deal with is Autocorrect. Despite the fact that smartphones are infinitely smarter than even a few years ago, they still have a hard time understanding the difference between what you are typing and what you intend to type. For example, whenever I used an abbreviation like "Dr." in the middle of a sentence, Autocorrect would helpfully insert a space after the abbreviation and automatically capitalize the next word. Of course, Autocorrect thought that the period in "Dr." was the end of the sentence, when it clearly wasn't. Other times, Autocorrect will not recognize a word that I have spelled correctly and change it to something that makes no sense in the context of the sentence I am typing. "Knitting Extraordinaire" becomes "Knitting extraordinary," and proper nouns like "Arcimoto Inc." become "RC motoring."
It is no wonder, then, that I became more and more frustrated every time Autocorrect would "fix" a sentence for me in a way that only made things worse. So I embarked on a typing experiment even more audacious than my switch from QWERTY to DVORAK: I did the unthinkable and turned off Autocorrect.
Helpless or Helpful?
Once I disabled Autocorrect on my phone, my virtual keyboard could no longer suggest words that didn't fit, insert punctuation where it didn't belong, or insist on capitalizing words in the middle of a sentence. But if you think this is a grand victory over my Android overlords, it is. Just not in the way you expect.
The truth is, even though I am a great touch-typist when using my whole hand, I am a terrible typist on my smartphone. Maybe that's because I'm "all thumbs" when I type on my phone? Either way, I'm constantly misspelling words and inserting incorrect punctuation and capitalization all on my own. When I turned off Autocorrect, I suddenly realized just how much Autocorrect had actually been helping me. Now, when I proofread my text messages, they are full of typos and mistakes. Instead of the one or two occasional problems I would encounter when typing with Autocorrect, now I encounter dozens. But this doesn't mean I have decided to throw in the towel and let Autocorrect take over my digital life once again. Instead, I have realized that this is the perfect opportunity for me to perfect my thumb-typing.
Instead of going back to the way things were, I will use this opportunity to make me a better smartphone typist. It will be a slow process to teach my thumbs to be more precise in their placement and exact in their movements, but it will happen. And when it does, I will have perfectly-spelled and punctuated messages that I typed myself: no robots required!
The End?
Now that I have migrated to such a uniquely customized keyboard, have I reached the end of my ergonomic journey? Far from it! Having a safer, more ergonomic keyboard is only one small part of creating a safer workplace. Having an ergonomic chair, adjusting the height of my computer screen, and upgrading to a standing desk are all measures that I can take to improve my health and safety when using my computer--but that is a discussion topic for another time!